1. Spring Cloud & MSA
1) MSA
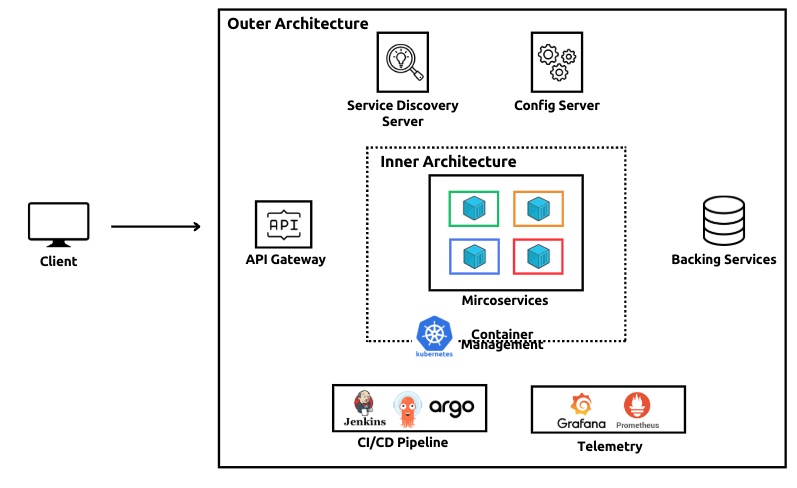
- 하나의 어플리케이션을 독립적인 서비스(MicroService)로 구성하는 Architecture
- 장점 : 확장성, 다양한 기술 스택 적용가능, 유지보수 용이, 장애 대응
- 핵심요소 : API Gateway, Service Mesh, Backing Service, CI/CD Automation, Telemetry, Container Management
2) MicroService Pattern
(1) 클라이언트와 마이크로서비스 통신 : API Gateway Pattern (라우팅/프록시, 보안 , 밸런싱)
(2) 마이크로 서비스 내부 통신 : Service Discovery Pattern ( 동적인 서비스 통신 )
(3) 비동기 통신 : Message Broker or Saga Pattern ( 분산 트랜젝션 처리 )
예) 주문처리 : 사용자-주문-결재-재고 등의 서비스가 함께 구동(트랜젝션 방식)
(4) 장애 : Circuit Breaker or Reply 패턴
(5) 운영 : Log Aggregation or Distributed Tracing패턴
(6) 데이터/상태 : Event Sourcing or CQRS 패턴
3) Spring Cloud 적용
- Spring Framework(Boot)기반의 MSA를 구현하는 프레임워크
- MSA에 요구되는 기능을 패턴과 인프라 기능을 자동 설정으로 구현
- Spring Cloud 적용 패턴
Config Server : Spring Cloud Config
Service Discovery : Spring Cloud Netflix Eureka
Service Communiation : SpringCloud OpenFeign
API Gateway : Spring Cloud Gateway
Fault Tolerance : Resilience4j
Disrtributed Tracing : Spring Cloud Leuth, Zipkin
Event-Driven Architecure : Spring Cloud Stream(Kafka, RabbitMQ)
4) 프로젝트 구성
(1) 기본 구성 설정
- git repository생성 및 로컬 폴더에 clone
- 프로젝트 생성 및 infra구성 (DB등)
- MicroService 생성 ( User/Order/Product의 model, controller, service, repository구성 )
2. Config-Server & Client
1) Config Server/Client기본구성
- spring cloud에서 config-server를 통해 설정 정보를 중앙에서 관리
( prod, stage, dev등의 역할에 맞게 적용, 포트 8888 )
- 개발 및 test를 위해 local에 저장소 설정 ( 운영시 Git으로 설정/적용)
2) Config-Server생성
- config-server 모듈 생성 ( config-server 의존성 필수 )
- 모듈내에 서버 정보(native로 구성) 및 Application에 @EnableConfigServer 어느테이션 설정
#application.yaml
server:
  port: 8888
spring:
  profiles:
    active: native
  application:
    name: config-server
  cloud:
    config:
      server:
        native:
          search-locations:
          - file:///${user.dir}/backend/config-repo
- 8888포트 부여 ( 브라우저 확인, http://localhost:8888/order-service/default)
(3) MicroService 연동
- 서비스를 config client설정하여 config server와 연결
① 의존성 설정 ( config client추가 - Spring 버전에 맞는 버전도 자동 설정 )
② application.yaml 설정 ( config server에 연결 )
#application.yaml 재설정 (config서버와 연결)
spring:
  config:
    import: "configserver:http://localhost:8888"
  application:
    name: user-service
  profiles:
    active: dev
③ Config-Server와 서비스(Config-Client)동적 연결
- 동적인 연결을 수행할 필드값을 MicroService에 추가
- 브라우저에서 해당 내용을 확인하기 위해 MicroService에 Controller생성
#Custom Field추가구성 (config-server내의 user-service.yaml)
server:
port: 8081
spring:
application:
name: user-service
datasource:
url: jdbc:mysql://localhost:3307/user_service_db
user:
service:
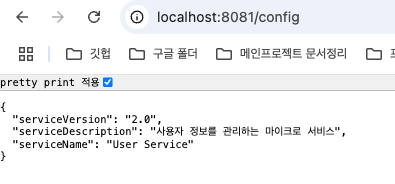
name: "User Service"
version: "1.0"
description: "사용자 정보를 관리하는 마이크로 서비스"
#ConfigController (서비스에 Custom설정을 환경변수로 확인가능한 controller추가)
package com.sesac.userservice.controller;
import io.swagger.v3.oas.annotations.tags.Tag;
import org.springframework.web.bind.annotation.RequestMapping;
import org.springframework.web.bind.annotation.RestController;
@RestController
@RequestMapping("/config")
@Tag(name="Config Test", description="설정값 확인용 API")
public class ConfigController {
http://localhost:8081/config
private String serviceName;
private String serviceVersion;
private String serviceDescription;
}
- 내용 변경을 반영해줄 management구성 application.yaml (config-repo_)
( http://localhost:8081/actuator/refresh에 적용)
# Refresh설정을 추가 (application.yaml, config-repo)
spring:
  datasource:
    driver-class-name: com.mysql.cj.jdbc.Driver
    username: root
    password: 123qwe
  jpa:
    hibernate:
      ddl-auto: update
    show-sql: true
    properties:
      hibernate:
        format_sql: true

management:
  endpoints:
    web:
      exposure:
        include: health, info, refresh
  endpoint:
      refresh:
        enabled: true
- serviceVersion을 2.0으로 변경하고 반영 ( Post요청이므로 curl로 진행 )
curl -X POST localhost:8081/actuator/refresh http://localhost:8081/config
3. Service Discovery
- 서비스 간 통신은 service-discovery server로 중앙집중 관리 (Eureka, DNS기능)
- 서비스가 등록되면 서비스 이름을 기반으로 조회 / 호출 / 헬스 체크 / 상태 관리
- 서비스 이름, IP주소/포트, 상태(UP/DOWN)
(1) Eureka서버 생성
- 모듈 생성 후 의존성 추가 ( eureka-server, config-client, actuator)
- EnableEurekaServer 어노테이션 추가
- Config Server연동
#Eureka서버 (어노테이션 추가)
package com.sesac.eurekaserver;

import org.springframework.boot.SpringApplication;
import org.springframework.boot.autoconfigure.SpringBootApplication;
import org.springframework.cloud.netflix.eureka.server.EnableEurekaServer;

@SpringBootApplication
@EnableEurekaServer
public class EurekaServerApplication {

	public static void main(String[] args) {
		SpringApplication.run(EurekaServerApplication.class, args);
	}

}

// eureka-service내의 application.yaml(config-server에 등록)
spring:
  config:
    import: "configserver:http://localhost:8888"
  application:
    name: eureka-server


//config.repo내의 Eureka연동을 위한 application.yaml 추가
server:
  port: 8761
spring:
  application:
    name: eureka-server

eureka:
  client:
    register-with-eureka: false   자기자신이 서버이므로 false
    fetch-registry: false
    service-url:
      defaultZone: http://localhost:8761/eureka/
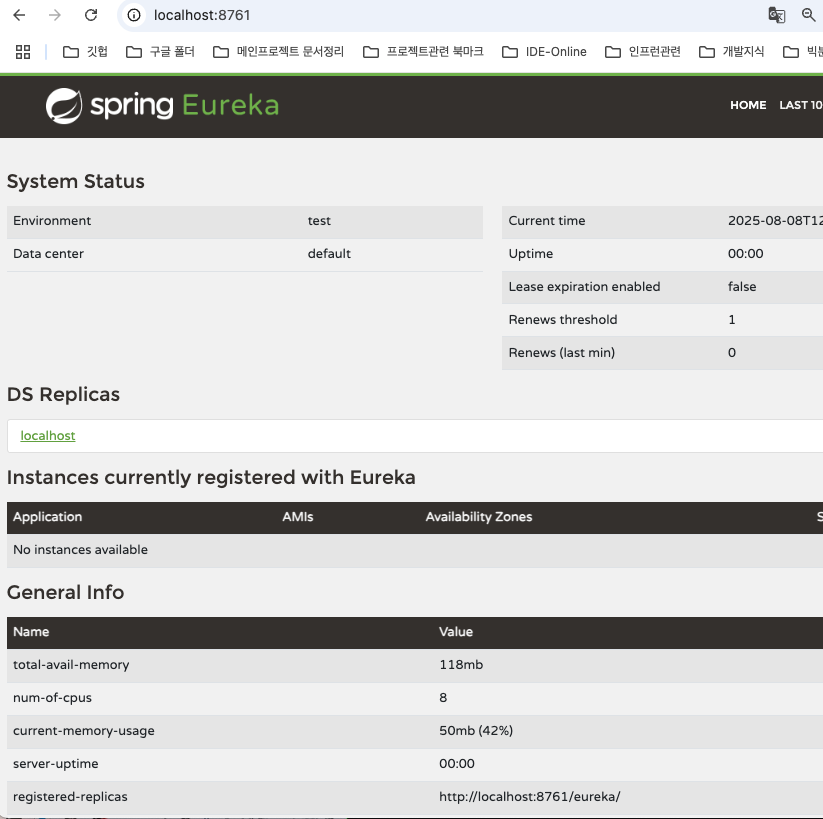
(2) Eureka Client등록 ( MicroService 등록 )
- 의존성 설정으로 자동 등록 ( Eureka Discovery Client 추가 )

4. 서비스간 통신 ( OpenFeign )
- 격리되어 구동되는 마이크로 서비스를 연결하는 통신체계 설정
- 동기 ( HTTP REST호출, gRPC ), 비동기 ( 브로커 - RabbitMQ, Kafka )
OpenFeign
- 동기 방식 중 HTTP 통신 방식 ( RestTemplate, WebClient, OpenFeign )
- interface와 annotation으로 통신 구현
(1) OpenFeign 적용
- MicroService에 의존성(OpenFeign) 추가
- 어플리케이션에 @EnableFeignClients추가
(2) 통신 Package구성
① MicroService에 관련 외부 모듈을 연결하는 클라이언트를 Inteface로 생성
- Order처리를 위한 관련 정보를 호출 ProductServiceClient, UserServiceClient 생성
- @OpenFeignClient어노테이션 추가
② 통신을 위한 관련 DTO생성 ( UserDto, ProductDto)와 OrderDto
- Micro-Service들은 id를 기준으로 Entity를 호출
- JSON문자열로 변환 (Entity필드의 이름과 값을 Key-Value로 매핑, jackson으로 직렬화)
이후 FeignClient가 JSON문자열을 Dto로 변환 ( Jackson으로 수행 )
//productDto
package com.sesac.orderservice.client.dto;

import lombok.Data;

import java.math.BigDecimal;

@Data
public class ProductDto {
    private Long id;
    private String name;
    private BigDecimal price;
    private Integer stockQuantity;
}


//userDto
package com.sesac.orderservice.client.dto;

import lombok.Data;

@Data
public class UserDto {
   private Long id;
   private String email;
   private String name;
}

//orderRequestDTO
package com.sesac.orderservice.dto;

import lombok.Data;

@Data
public class OrderRequestDto {
    private Long productId;
    private String userId;
    private Integer quantity;
}

//ProductServiceClient
package com.sesac.orderservice.client;

import com.sesac.orderservice.client.dto.ProductDto;
import org.springframework.cloud.openfeign.FeignClient;
import org.springframework.web.bind.annotation.GetMapping;
import org.springframework.web.bind.annotation.PathVariable;

@FeignClient (name = "product-service")
public interface ProductServiceClient {

    @GetMapping("products/id")
    ProductDto getUserById(@PathVariable("id") Long id);
}

//UserServiceClient
package com.sesac.orderservice.client;

import com.sesac.orderservice.client.dto.UserDto;
import org.springframework.cloud.openfeign.FeignClient;
import org.springframework.web.bind.annotation.GetMapping;
import org.springframework.web.bind.annotation.PathVariable;

@FeignClient (name = "user-service")
public interface UserServiceClient {

    @GetMapping("users/id")
    UserDto getUserById(@PathVariable("id") Long id); //OpenFeign이 구체적으로 구성하지 않아도 추상화

}
5. API Gateway (외부통신)
- 마이크로 서비스에 접근하기 위한 관문 역할 ( 쿠버네티스의 Ingress와 유사한 기능, 리버스 프록시 )
- 보안(인증/인가), 로깅, 라우팅, 암호화, 모니터링 ( 프론트와 통신할때 사용)
(1) 백엔드에 api-gateway모듈 생성
① 의존성 설정
- Gateway, config client, actuator, lombok, eureka discovery client등
( Gateway대신에 Reactive Gateway(비동기 통신 가능)도 추가적인 기능이 있어 적용은 가능)
② 구성 설정
- Module내의 yaml과 config-server에 적용될 yaml을 구성
//application.yaml (config서버를 바라보도록 설정, eureka도 config를 바라봄)
spring:
  config:
    import: "configserver:http//:localhost:8888"
  application:
    name: api-gateway

//api-gateway.yaml (config-server에 반영되도록 설정)
server:
  port: 8080

spring:
  application:
    name: api-gateway
  cloud:
    gateway:
      server:
        webmvc:
          routes:
            - id: user-service           # 고유한 이름
              uri: lb://user-service     # 로드밸런서에 목적지 표시(http가 아니므로 ip/포트에 무관하게 서비스 연결
              predicates:
                - Path=/api/users/**     # 조건 (어떠한 path를 처리할 것인가)
              filters:
                - StripPrefix=1          # 1개의 경로제거 ("api"제거 후 서비스로 전달)

            - id: product-service
              uri: lb://product-service
              predicates:
                - Path=/api/products/**
              filters:
                - StripPrefix=1

            - id: order-service
              uri: lb://order-service
              predicates:
                - Path=/api/orders/**
              filters:
                - StripPrefix=1


(2) CORS설정 (CofsConfig파일 구성)
① api-gateway server에서 CORS처리 ( front의 포트 3001 허용 )
package com.sesac.apigateway;

import org.springframework.context.annotation.Configuration;
import org.springframework.web.servlet.config.annotation.CorsRegistry;
import org.springframework.web.servlet.config.annotation.WebMvcConfigurer;

@Configuration
public class CorsConfig implements WebMvcConfigurer {

    @Override
    public void addCorsMappings(CorsRegistry registry){
        registry.addMapping("/**")  //모든 경로에 대해 설정
                .allowedOrigins("http://localhost:3001")
                .allowedMethods("GET", "POST", "PUT", "DELETE","OPTIONS")
                .allowedHeaders("*")
                .allowCredentials(true)
                .maxAge(3600);
    }
② front-end와 연결

6. 인증/인가
1) MSA의 인증/인가
① MSA구조에서 인증/인가는 api-gateway를 중심으로 수행
- JWT기반의 인증 권장 ( 세션방식은 각 MicroService가 인증 관련 정보 필요 )
② 인증 - 사용자 생성 및 인증은 User정보를 처리하는 MicroService에서 수행
인가 - API-Gateway에서 token으로 권한이 확인 후 관련 MicroService로 라우팅
③ 인증과 인가 Process
로그인 시도 - ID/PW검증(User서비스) - 토큰 발급 - API 요청시 헤더의 토큰검증(API-Gateway서버)
2) User서비스에 인증 프로세스 구성
- Spring Security & JWT 관련 의존성 추가
	implementation 'io.jsonwebtoken:jjwt-api:0.12.6'
	implementation 'io.jsonwebtoken:jjwt-impl:0.12.6'
	implementation 'io.jsonwebtoken:jjwt-jackson:0.12.6'

	implementation 'org.springframework.boot:spring-boot-starter-security'
	testImplementation 'org.springframework.security:spring-security-test'
	implementation 'org.springframework.security:spring-security-crypto'
3) JWT Processing Module & DTO
(1) JWT 처리 모듈
① JwtTokenProvider
- 서명에 사용될 키 생성(secret사용)
- payload, claim을 구성 후 키로 서명하여 Token생성
- Token validation 및 email, userId등을 추출하는 함수 작성
import io.jsonwebtoken.*;
import io.jsonwebtoken.security.Keys;
import org.springframework.beans.factory.annotation.Value;
import org.springframework.stereotype.Component;

import javax.crypto.SecretKey;
import java.util.Date;

@Component
public class JwtTokenProvider {

    @Value("${jwt.secret:mySecretKeyForJWTTokenGenerationThatShouldBeLongEnough}")
    private String jwtSecret;   // 값이 없는 경우 반영할 기본설정값도 표시

    @Value("${jwt.expiration:86400000}") // 24시간
    private int jwtExpirationMs; // 값이 없는 경우 반영할 기본설정값도 표시

    private SecretKey getSigningKey() {
        return Keys.hmacShaKeyFor(jwtSecret.getBytes());
    } //jwt.secret의 문자열을 암호화하여 서명 Key생성

    public String generateToken(String email, Long userId) {
        Date expiryDate = new Date(System.currentTimeMillis() + jwtExpirationMs);

        return Jwts.builder()
                .subject(email)
                .claim("userId", userId)
                .issuedAt(new Date())
                .expiration(expiryDate)
                .signWith(getSigningKey())
                .compact();  //이메일/클레임/생성일/만료일/SignKey로 생성
    }
② SecurityConfig
접근경로 별 권한에 대한 설정, 비밀번호 보안설정 ( Encoder이지만 실제로 Hashing )
//Security Config (보안 정책설정)

@Configuration
@EnableWebSecurity  //웹보안 활성화
public class SecurityConfig {
    @Bean
    public BCryptPasswordEncoder passwordEncoder() {
        return new BCryptPasswordEncoder();
    } //Encoder설정

    @Bean //접근 경로에 대한 권한설정
    public SecurityFilterChain filterChain(HttpSecurity http) throws Exception {
        http
                .csrf(csrf -> csrf.disable())
                .sessionManagement(session ->
                        session.sessionCreationPolicy(SessionCreationPolicy.STATELESS))
                .authorizeHttpRequests(auth ->
                        auth.requestMatchers("/users/login", "/actuator/**").permitAll()
                                .anyRequest().permitAll()
                );

        return http.build();
    }

}
(2) dto생성
- Login 요청 및 응답에 사용할 DTO
//LoginResponse DTO

@Data
public class LoginResponse {
    private String token;
    private String type = "Bearer";
    private Long userId;
    private String email;
    private String name;

    public LoginResponse(String token, Long userId, String email, String name) {
        this.token = token;
        this.userId = userId;
        this.email = email;
        this.name = name;
    }
}
4) 로그인 기능 구현
- User-Service(MicroService)에 Controller/Service/Repository 구현
   // Controller
   @PostMapping("/login")
    @Operation(summary="로그인", description="이메일과 패스워드로 로그인후 JWT토큰발급")
    public ResponseEntity<LoginResponse> login(@RequestBody LoginRequest request){
        try {
            LoginResponse response = userService.login(request);
            return ResponseEntity.ok(response);
        }catch(RuntimeException e) {
            return ResponseEntity.notFound().build();
        }

  // Service (사용자 조회 및 패스워드 검증 후, 토큰 생성 및 응답)
  private final PasswordEncoder passwordEncoder;
  private final JwtTokenProvider jwtTokenProvider;

    public LoginResponse login(LoginRequest request) {

      User user = userRepository.findByEmail(request.getEmail())
              .orElseThrow(() -> new RuntimeException(("invalid Email")));
      // 패스워드 검증 ( DB저장시 비문, password encoder로 인코딩된 패스워드로 DB와 비교)
      if (!passwordEncoder.matches(request.getPassword(), user.getPassword())){
          throw new RuntimeException("invalid email or password");
      }
      // JWT 토큰 및 응답 생성
      String token= jwtTokenProvider.generateToken(user.getEmail(), user.getId());
      return new LoginResponse(token, user.getId(),user.getEmail(), user.getName());
  }
5) API 요청시 토큰 검증
- api-gateway내의 JwtAuthenticationFilter에서 doFilter 메서드를 오버라이드
( 스프링 부트의 Auto-configuration과 Component Scan으로 인해 요청을 가로채서 검증수행 )
package com.sesac.apigateway;

import io.jsonwebtoken.Claims;
import io.jsonwebtoken.Jwts;
import io.jsonwebtoken.JwtException;
import io.jsonwebtoken.security.Keys;
import org.springframework.beans.factory.annotation.Value;
import org.springframework.core.annotation.Order;
import org.springframework.stereotype.Component;

import jakarta.servlet.*;
import jakarta.servlet.http.HttpServletRequest;
import jakarta.servlet.http.HttpServletResponse;
import javax.crypto.SecretKey;
import java.io.IOException;
import java.util.Collections;
import java.util.Enumeration;
import java.util.HashSet;
import java.util.Set;

@Component   //do Filter 오버라이드
public class JwtAuthenticationFilter implements Filter {

   //설정값 가져오기
    @Value("${jwt.secret:mySecretKeyForJWTTokenGenerationThatShouldBeLongEnough}")
    private String jwtSecret;

    private SecretKey getSigningKey() {
        return Keys.hmacShaKeyFor(jwtSecret.getBytes());
    }

   // API 요청을 가로채 path, method확인 (요청객체, 응답객체 : 내용이 빈 기본형 생성)
    @Override
    public void doFilter(ServletRequest request, ServletResponse response, FilterChain chain)
            throws IOException, ServletException {

        // Wrapper적용
        HttpServletRequest httpRequest = (HttpServletRequest) request;
        HttpServletResponse httpResponse = (HttpServletResponse) response;

        //주소, method확인 (가로챈 요청)
        String path = httpRequest.getRequestURI();
        String method = httpRequest.getMethod();

        System.out.println("JWT Filter - Path: " + path + ", Method: " + method);

        // 공개 경로는 인증 없이 통과
        if (isPublicPath(path, method)) {
            System.out.println("JWT Filter: Public path, allowing request");
            chain.doFilter(request, response);
            return;
        }

        // JWT 토큰 검증 ( 토큰이 없거나 validation이 안되면 )
        String token = getTokenFromRequest(httpRequest);
        if (token == null || !validateToken(token)) {
            System.out.println("JWT Filter: Invalid or missing token");
            httpResponse.setStatus(HttpServletResponse.SC_UNAUTHORIZED);
            httpResponse.getWriter().write("{\"error\":\"Unauthorized\"}");
            return;
        }

        // JWT에서 사용자 ID 추출하여 헤더에 추가
        Long userId = getUserIdFromToken(token);
        if (userId != null) {
            CustomHttpServletRequestWrapper requestWrapper = new CustomHttpServletRequestWrapper(httpRequest, userId);
            System.out.println("JWT Filter: Valid token, adding X-User-Id: " + userId);
            chain.doFilter(requestWrapper, response);
        } else {
            System.out.println("JWT Filter: Unable to extract userId from token");
            httpResponse.setStatus(HttpServletResponse.SC_UNAUTHORIZED);
            httpResponse.getWriter().write("{\"error\":\"Invalid token claims\"}");
        }
    }

   //인증이 필요없는 PublicPath설정
    private boolean isPublicPath(String path, String method) {
        return path.equals("/api/users/login") ||
                path.startsWith("/api/products") ||
                path.startsWith("/actuator/") ||
                "OPTIONS".equals(method);
    }

    //Request의 헤더에서 Token추출
    private String getTokenFromRequest(HttpServletRequest request) {
        String bearerToken = request.getHeader("Authorization");
        if (bearerToken != null && bearerToken.startsWith("Bearer ")) {
            return bearerToken.substring(7);
        }
        return null;
    }

    // 파서(규칙에 따라 문자열 해석)키를 검증_ 위조/유효성 검사
    private boolean validateToken(String token) {
        try {
            Jwts.parser()
                    .verifyWith(getSigningKey())
                    .build()
                    .parseSignedClaims(token);
            return true;
        } catch (JwtException | IllegalArgumentException e) {
            return false;
        }
    }

    //토큰에서 UserId추출
    private Long getUserIdFromToken(String token) {
        try {
            Claims claims = Jwts.parser()
                    .verifyWith(getSigningKey())
                    .build()
                    .parseSignedClaims(token)
                    .getPayload();

            return claims.get("userId", Long.class);
        } catch (JwtException | IllegalArgumentException e) {
            return null;
        }
    }

    // UserId를 (X-User-Id) MicroService에 전달할수 있도록 Wrapper생성
    private static class CustomHttpServletRequestWrapper extends jakarta.servlet.http.HttpServletRequestWrapper {
        private final Long userId;

        public CustomHttpServletRequestWrapper(HttpServletRequest request, Long userId) {
            super(request);
            this.userId = userId;
        }

        @Override
        public String getHeader(String name) {
            if ("X-User-Id".equals(name)) {
                return String.valueOf(userId);
            }
            return super.getHeader(name);
        }

        @Override
        public Enumeration<String> getHeaderNames() {
            Set<String> headerNames = new HashSet<>();
            Enumeration<String> originalNames = super.getHeaderNames();
            while (originalNames.hasMoreElements()) {
                headerNames.add(originalNames.nextElement());
            }
            headerNames.add("X-User-Id");
            return Collections.enumeration(headerNames);
        }

        @Override
        public Enumeration<String> getHeaders(String name) {
            if ("X-User-Id".equals(name)) {
                return Collections.enumeration(Collections.singletonList(String.valueOf(userId)));
            }
            return super.getHeaders(name);
        }
    }
}
6) MicroService 인증 정보 획득하여 이후 프로세스 수행 ( order서비스 주문내역 구성 )
- request의 "X-User-Id"를 인자로 하여 getHeader메서드로 userId 추출
- 사용자 요청에 따른 프로세스 처리 후 회신
Order List Response
    @GetMapping("/my")
    @Operation(summary="내 주문목록", description="로그인한 사용자의 주문목록조회")
    public ResponseEntity<List<Order>> getMyOrder(HttpServletRequest request) {
     // API GATEWAY에서 전달한 X-User-Id 헤더에서 사용자 ID추출
        String userIdHeader = request.getHeader("X-User-Id");
        if(userIdHeader == null) {
            return ResponseEntity.status(HttpStatus.UNAUTHORIZED).build();
        }

        List<Order> order= orderService.getOrdersByUserId(Long.parseLong(userIdHeader));
        return ResponseEntity.ok(order);
    } // HttpServletRequest로 들어오는 내용은 HTTP 요청 원본에 해당, Header를 읽어들임


   public List<Order> getOrdersByUserId(Long userId) {
      return orderRepository.findByUserIdOrderByCreatedAtDesc(userId);
    }
7. 회복성 패턴 (resilience4j)
- 장애 전파를 방지: MicroService의 장애는 다른 서비스의 수행에 지장초래
예) User-Service장애시 Order에서 주문처리
JWT토큰 헤더로 전달받은 UserId로 주문 생성 후 세부 정보는 이후에 전달받을 수 있도록 설정
1) 회복성 패턴
- Circuit Breaker, Retry, Rate Limiter, Bulkhead, Time Limiter, Cache
(1) Circuit Breaker : 원격 서비스 실패시 추가요청 차단으로 장애 확산방지
- Open(장애발생 시 Breaker설정 ), Half-Open, Closed
(2) Retry : 일시적 장애에 대해 지정된 횟수만큼 재시도 (장애 극복시도)
(3) Time Limiter(타임 아웃) : 특정 시간 내 응답 부재시 실패처리 (자원 낭비방지)
(4) Rate Limiter(속도제한) : 일정 시간내 받을수 있는 응답 호출수 제한 (과부하 방지)
(5) Bulkhead : 동시 요청 수 제한 (과부하 방지/서비스 격리)
(6) Cache : 결과 캐싱 (빠른 응답제공)
** 실습
- Order Service의 CreateOrder의 user호출 (주문 생성 후 User-Service 장애시 Id로만 주문 처리수행)
- CircuitBreaker, Retry 적용
2) Circuit Breaker
(1) 의존성 추가 : resilience4J (Spring Cloud Circuit Breaker)
implementation 'org.springframework.cloud:spring-cloud-starter-circuitbreaker-resilience4j'
(2) OrderService 회복성 로직 생성 ( UserServiceClient를 Facade객체로 감싸고 보완 )
① UserService에 회복성을 추가한 UserServiceFacade생성 ( 로그 출력, Slf4j 어노테이션 )
② CircuitBreaker 어노테이션에 관련 마이크로 서비스와 장애시 구동할 FallbackMethod 명시
package com.sesac.orderservice.facade;

import com.sesac.orderservice.client.UserServiceClient;
import com.sesac.orderservice.client.dto.UserDto;
import io.github.resilience4j.circuitbreaker.annotation.CircuitBreaker;
import lombok.RequiredArgsConstructor;
import lombok.extern.slf4j.Slf4j;
import org.springframework.stereotype.Service;

@Service
@RequiredArgsConstructor
@Slf4j
public class UserServiceFacade {

    private final UserServiceClient userServiceClient;

    @CircuitBreaker(name="user-service" , fallbackMethod = "getUserFallback")
    public UserDto getUserById(Long userId) {
        log.info("User Service호출시도 - userId={}", userId);
        return userServiceClient.getUserById(userId);
   }

    //fallBack 메서드: User Service장애시 기본 사용자 반환
    public UserDto getUserFallback(Long userId, Throwable ex) {

        log.warn("User Service 장애감지 : Fallback 실행 - userId={}", userId, ex);
        UserDto defaultUser = new UserDto();
        defaultUser.setId(userId);
        defaultUser.setName("임시 사용자");
        defaultUser.setEmail("temp@example.com");

        return defaultUser;
    }
}
** facade와 유사한 기능으로 처리 ( 복잡한 내용은 감추어 필요한 내용만 수행 )
- 복잡한 여러 기능을 단순한 인터페이스로 감싸 쉽게 쓸 수 있도록 하는 구조 패턴
(3) Order Service에 UserServiceFacade 적용 ( 실패시 FallBack메서드 수행 )
① UserServiceClient에서 User정보 획득시도 후 장애 시 명시된 FallBack함수 수행
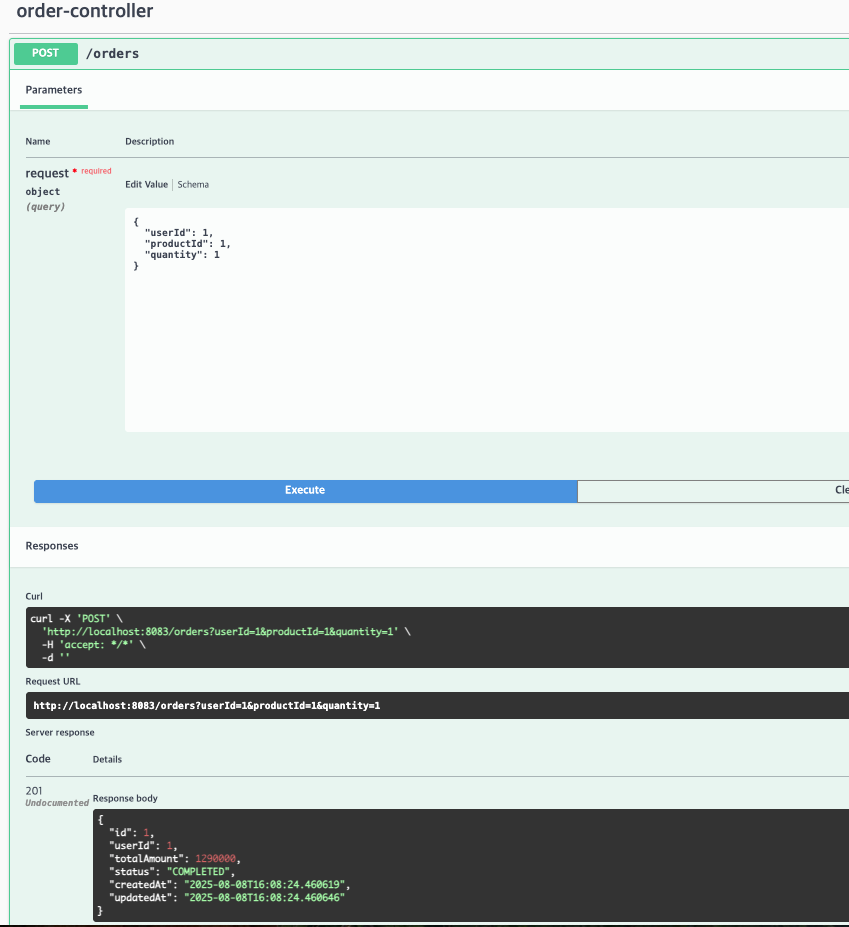
//원본 코드
@Transactional
    public Order createOrder(OrderRequestDto request) {

        //주문자 정보
        UserDto user = userServiceClient.getUserById(request.getUserId());
        if (user == null) throw new RuntimeException("User not found");

        //제품 정보
        ProductDto product = productServiceClient.getProductById(request.getProductId());
        if (product == null) throw new RuntimeException("Product not found");

        //재고 정보
        if (product.getStockQuantity() < request.getQuantity()) {
            throw new RuntimeException("Out of stock");
        }

        Order order = new Order();
        order.setUserId(request.getUserId());
        order.setTotalAmount(product.getPrice().multiply(BigDecimal.valueOf(request.getQuantity())));
        order.setStatus("COMPLETED");

        return orderRepository.save(order);
    }

    public List<Order> getOrdersByUserId(Long userId) {
      return orderRepository.findByUserIdOrderByCreatedAtDesc(userId);
    }

}

//수정 내용 (userService에서 userServiceFacade로 변경 )
public class OrderService {
  private final OrderRepository orderRepository;
  private final ProductServiceClient productServiceClient;
  private final UserServiceFacade userServiceFacade;

  public Order findById(Long id) {
      return orderRepository.findById(id).orElseThrow(
              () -> new RuntimeException(("User not found with id: "+id))
      );
  }

    @Transactional
    public Order createOrder(OrderRequestDto request) {

        UserDto user = userServiceFacade.getUserById(request.getUserId());
        if (user == null) throw new RuntimeException("User not found");

        ProductDto product = productServiceClient.getProductById(request.getProductId());
        if (product == null) throw new RuntimeException("Product not found");

        if (product.getStockQuantity() < request.getQuantity()) {
            throw new RuntimeException("Out of stock");
        }

        Order order = new Order();
        order.setUserId(request.getUserId());
        order.setTotalAmount(product.getPrice().multiply(BigDecimal.valueOf(request.getQuantity())));
        order.setStatus("COMPLETED");

        return orderRepository.save(order);
    }
② Order-Service 설정값 추가 ( config-repo내의 order-service.yaml )
- instances에 CircuitBreaker설정 추가 (@CircuitBreaker의 name기준으로 조건추가)
- sliding-window-type (sliding window에서 갯수기준 판단 )
sliding-window : 크기(3), 최소조건 (3번 호출), 불량율 ( 50% 이상)
- 문제 해결확인(2번 호출 결과에 따라 브레이커 Close)
half-open ( default로 beaker open 60초후에 자동설정 후 지정된 조건에 따라 close )
- actuator의 모니터 기능설정
endpoints : 개별 기능 노출 여부설정 ( 웹으로 노출 )
endpoint : 웹으로 표시할 개별 기능들에 세부 동작방식 설정
info : 입력된 기본정보 (버전/빌드/커밋등 비민감 정보 및 사용자에 의한 정보 추가가능)
circuitbreakerevent : circuit breaker의 open/close에 대한 이벤트 정보(디버깅 유용)
server:
  port: 8083
spring:
  application:
    name: order-service
  datasource:
    url: jdbc:mysql://localhost:3307/order_service_db

# User Service 호출에 대한 회복성  패턴추가
resilience4j:
  circuitbreaker:
    instances:
      user-service:   # @CircuitBreaker(name = "user-service"..) 를 의미
        sliding-window-type: count-based # user서비스를 order서비스에서 호출할 때, 호출 횟수를 카운트
        sliding-window-size: 3
        minimum-number-of-calls: 3 # 최소 호출 횟수
        failure-rate-threshold: 50 # 50% 실패 시 Circuit Open
        permitted-number-of-calls-in-half-open-state: 2 # half-open일 때 몇번 요청할지


management:
  endpoints:
    web:
      exposure:
        include: health, info, circuitbreakers, circuitbreakerevents
  endpoint:
    health:
      show-details: always
  health:
    circuitbreakers:
      enabled: true
④ 상태확인 ( actuator로 외부 노출 )
- health : show details에 의해 전체 항목 표시 ( 기본 설정은 "status": "UP"만 표시됨 )
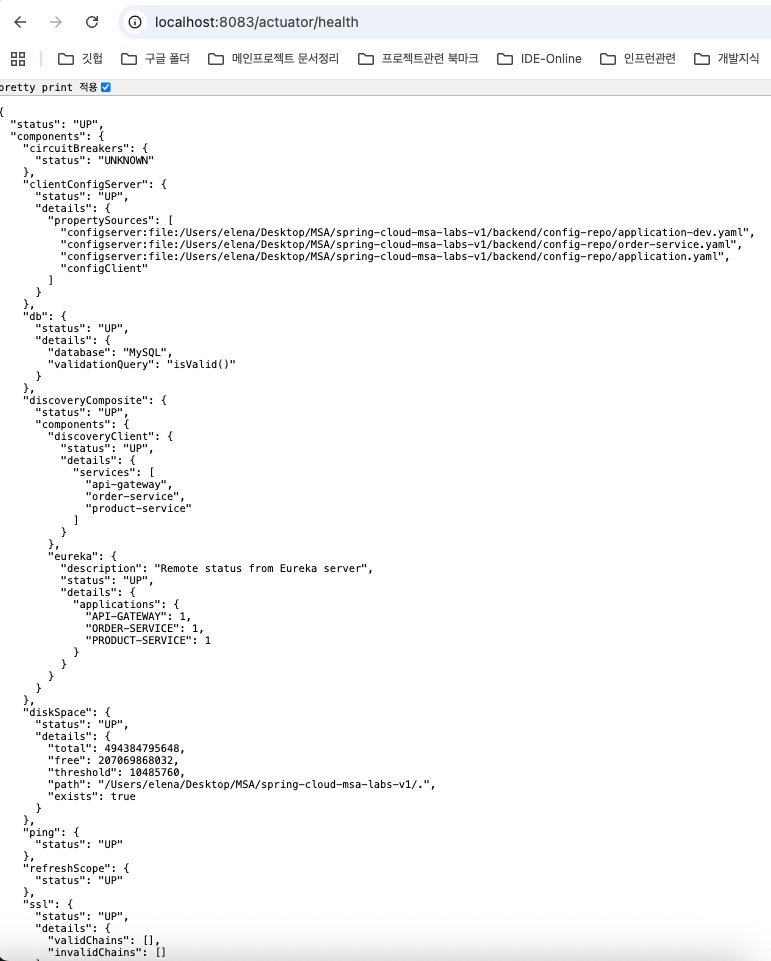
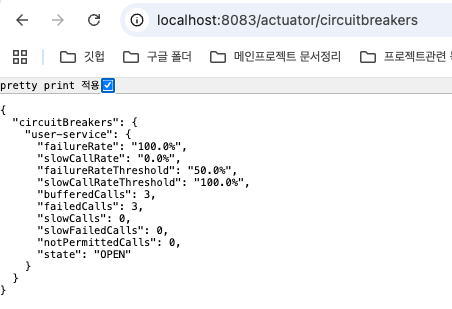
- circuitbreaker : user-service 장애시 3회 이상 오류로 "OPEN"상태 (default, "CLOSED")
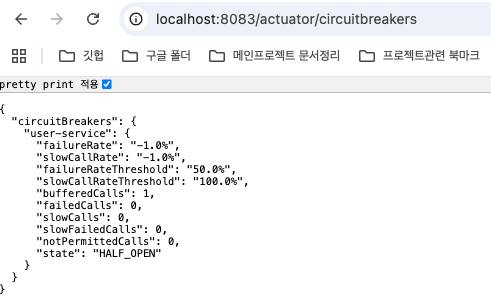
- circuitbreaker : CLOSED에서 HALF_OPEN으로 변경된 상태

(2) Retry
① 의존성 설정값 추가 : resilience4J 하단에 Retry추가
- AspectOrder : 메서드를 적용 체계 설정
circuitbreakerAspectOrder: 1 , retryAspectOrder: 2 ( CurcuitBreaker가 Retry를 감싸줌 )
- instance ( 재시도 규칙을 설정할 항목 규정 2회, 1초 간격 )
//order-service.yaml에 retry추가

server:
  port: 8083
spring:
  application:
    name: order-service
  datasource:
    url: jdbc:mysql://localhost:3307/order_service_db

# User Service 호출에 대한 회복성  패턴
resilience4j:
  circuitbreaker:
    circuitbreakerAspectOrder: 1 #회복성 순서
    instances:
      user-service: # @CircuitBreaker(name = "user-service"..) 를 의미
        sliding-window-type: count-based # user서비스를 order서비스에서 호출할 때, 호출 횟수를 카운트
        sliding-window-size: 3
        minimum-number-of-calls: 3 # 최소 호출 횟수
        failure-rate-threshold: 50 # 50% 실패 시 Circuit Open
        permitted-number-of-calls-in-half-open-state: 2 # half-open일 때 몇번 요청할지

  retry:
    retryAspectOrder: 2
    instances:
      user-service:
        max-attempts: 2
        wait-duration: 1s  # 재시도 간격


management:
  endpoints:
    web:
      exposure:
        include: health, info, circuitbreakers, circuitbreakerevents
  endpoint:
    health:
      show-details: always
  health:
    circuitbreakers:
      enabled: true

// facade파일의 서비스 호출함수에 retry annotation추가
    @CircuitBreaker(name="user-service" , fallbackMethod = "getUserFallback")
    @Retry(name = "user-service")
    public UserDto getUserById(Long userId) {
        log.info("User Service호출시도 - userId={}", userId);
        return userServiceClient.getUserById(userId);
   }
** AspectOrder숫자가 적은 쪽이 외부로서 내부의 메서드를 설정에 맞게 수행시키고 난 후 최종 Failure판단
➡ retry후 fallback수행 로그

8. OpenTelemetry기반 분산추적
1) 분산 추적
- 다수의 마이크로 서비스를 운영하면서 장애나 병목을 파악하기 어려움
- 추적 도구로서 요청 흐름과 장애 내용 파악 ( Trace Id를 생성하여 전파 ) 및 성능 최적화
- 필수 개념 : Trace ( 요청이 시스템을 거치는 전체과정) + Sapn (트레이스의 개별작업단위)
Trace를 위한 Id가 생성 ( 요청이 진행되면서 내부의 세부작업에 Span이 생성, 자동 생성 )
Span을 별도로 구성해 줄수도 있으며, 이런 경우 최적화 가능
2) OpenTelemetry
- 분산 추적 도구 ( 언어에 제한없음, 현재 지속적으로 revision/최신화 중인 도구 중 하나 )
- 메트릭, 트레이스, 로그를 모두 수집하여 Export ( 시각화 도구를 부가 가능 )
로그는 Loki, 트레이스는 Zipkin, 메트릭은 Prometeus + Grafana
(1) docker에 zipkin설정 추가 (infra)
- 포트 9411, msa-network로 설정
version: '3.8'

services:
  mysql:
    image: mysql:8.0
    container_name: msa-mysql
    ports:
      - "3307:3306"
    volumes:
      - mysql-data:/var/lib/mysql
      - ./mysql/init:/docker-entrypoint-initdb.d
    environment:
      MYSQL_ROOT_PASSWORD: 123qwe
      MYSQL_ALLOW_EMPTY_PASSWORD: "no"
      TZ: Asia/Seoul
    command:
      - --character-set-server=utf8mb4
      - --collation-server=utf8mb4_unicode_ci
      - --skip-character-set-client-handshake
    restart: always

# Zipkin구동 추가
  zipkin:
    image: openzipkin/zipkin:latest
    container_name: msa-zipkin
    ports:
      - "9411:9411"
    networks:
      - msa-network

volumes:
  mysql-data:

networks:
  msa-network:
    driver: bridge
(2) api-gateway 및 MicroService에 Zipkin추가
① 의존성 추가
- MicroService에 zipkin 의존성 추가 (기존 api-gateway에 추가했던것 )
#OpenTelemetry와 zipkim 관련 설정
    implementation 'io.micrometer:micrometer-tracing-bridge-otel'
	implementation 'io.opentelemetry:opentelemetry-exporter-zipkin'


#여러 서비스에 연결된 Interaction을 확인하고자 하면 추가 (Order-Service)
	implementation 'io.github.openfeign:feign-micrometer'
** 사용하는 spring이나 구조에 따라 도구 및 버전 설정에 유의
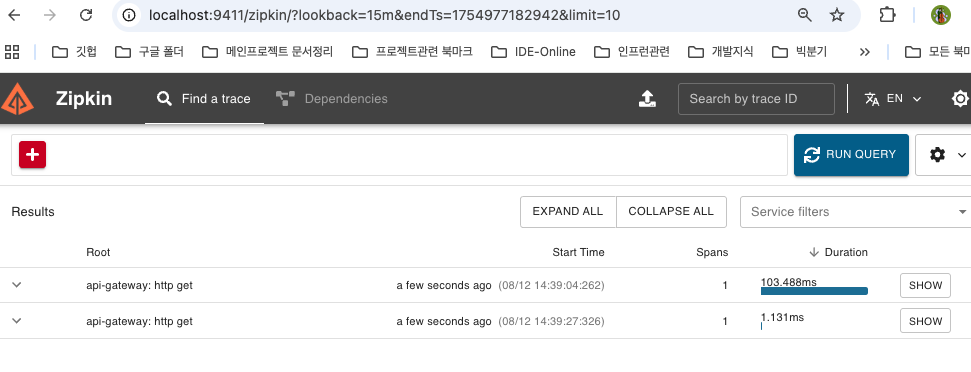
➡ zipkin 화면으로 확인
② Trace에 관련된 설정을 dev에 추가
- config-repo내의 공통 설정에 반영 : applicaiton-dev.yaml 반영 ( api-gateway의 profile설정도 dev로 변경 )
- Micro-service에도 반영 ( Profile dev변경)
# api-gateway의 기초를 dev로 profile설정
spring:
  profiles:
    active: dev
  config:
    import: "configserver:http://localhost:8888"
  application:
    name: api-gateway

#config-repo의 application-dev.yaml에 trace반영
spring:
  jpa:
    show-sql: true
    properties:
      hibernate:
        format_sql: true

management:   # actuator 및 분산추적을 위한 endpoint설정
  endpoints:
    web:
      exposure:
        include: health, info, metrics, tracing, refresh

  tracing:
    sampling:
      probability: 1.0   # tracing sampling확률설정 (100%)

  zipkin:
    tracing:
      endpoint: http://localhost:9411/api/v2/spans  #zipkin으로 tracing데이터 출력

otel:
  exporter:
    zipkin:
      endpoint: http://localhost:9411/api/v2/spans #opentelemetry의 데이터를 zipkin으로 export
  resource:
    attributes:
      service.name: ${spring.application.name} # zipkin에 마이크로서비스 이름표시

logging:
  pattern:    # 로그 메시지의 형식지정, 하나의 요청이 여러서비스에 적용될때 동일한 traceId가 부여하여 추적
    console: "%d{yyyy-MM-dd HH:mm:ss} [%X{traceId:-},%X{spanId:-}] %-5level %logger{36} - %msg%n"
  level:
    com.sesac: DEBUG
    io.micrometer.tracing: DEBUG
    org.springframework.web: DEBUG
③ Trace ID로 추적
- 앱 구동시 관련 통신내역을 추적하여 표시, 마이크로 서비스의 로그에서도 찾을수 있음

① API Gateway (주문 접수 및 api/orders로 Order-Service호출 )
② Order-Service 주문처리 ( 접수된 요청에 대해 createOrder 수행)
➡ User-Service호출 : 사용자정보조회 외 Security를 포함한 세부작업 수행
➡ Product-Service호출 : 상품 정보 수신

_______________________________________________________________
주의 사항
-- sql파일로 DB생성 시 한글 깨짐 주의 ( docker-compose내에 반영 )
--skip-character-set-client-handshake
-- 깃 커밋에 대한 폰트 설정 ( 한글 구동, 터미널에서 수행)
git config --global i18n.commitEncoding utf-8
git config --global i18n.logOutputEncoding utf-8
'Infra' 카테고리의 다른 글
| AWS_Cloud_6th (0) | 2025.09.08 |
|---|---|
| AWS_Cloud_5th (0) | 2025.09.04 |
| AWS_CLOUD_2nd (3) | 2025.08.23 |
| AWS_CLOUD_1st (4) | 2025.08.22 |